
Continuing my crusade for wide spread use of Google's Picasa program, again a FREE program, here is an example of its function called "Focus B&W". It gives you means to convert an image to black and white overall, but leaves an adjustable area of the image untouched in color. You can control the location of the color focus point, as well as size and blending sharpness of the untouched area. It's quick and easy, so it isn't perfect and image selection is the most critical part of applying this feature successfully. Let's see how you like this one.
This is Manhattan in NYC with Manhattan Bridge in the foreground.

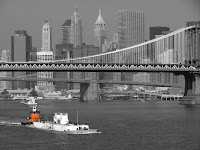
I was able to leave out fairly well defined orange structure of the tug boat and convert the rest of the image to B&W. The key to having this feature look natural (and in many cases, like there was a lot of touch up work involved) is the image selection. The area intended to remain in color, must be well defined and not have "busy" surroundings, so as to avoid the "spill over" effect. Keep in mind, that in order to have such a feature applied in auto, programmer's used a circle as a basic shape. While the blending sharpness (or feathering effect of the transition) can be adjusted, it's still far from flexible enough for many cases. So be judicious in choosing the image and you will like the outcome. Bottom line: there is a lot to appreciate about Picasa. In the very least, it will show you the potential of digital manipulation. Sophisticated programs (like Photoshop, Paint Shop Pro, and perhaps most importantly the free GIMP) give an actual total control of what can be done, with an appropriate learning curve to go along of course.
If you would like to see some of other Picasa features applied, check out this short piece with examples of focus and tonal changes.
...


