
test
--
...
Tuesday, October 11, 2016
Tuesday, November 11, 2008
Example of "Focus B&W" function in Picasa
Continuing my crusade for wide spread use of Google's Picasa program, again a FREE program, here is an example of its function called "Focus B&W". It gives you means to convert an image to black and white overall, but leaves an adjustable area of the image untouched in color. You can control the location of the color focus point, as well as size and blending sharpness of the untouched area. It's quick and easy, so it isn't perfect and image selection is the most critical part of applying this feature successfully. Let's see how you like this one.
This is Manhattan in NYC with Manhattan Bridge in the foreground.

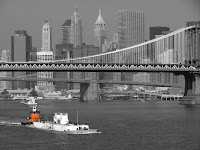
I was able to leave out fairly well defined orange structure of the tug boat and convert the rest of the image to B&W. The key to having this feature look natural (and in many cases, like there was a lot of touch up work involved) is the image selection. The area intended to remain in color, must be well defined and not have "busy" surroundings, so as to avoid the "spill over" effect. Keep in mind, that in order to have such a feature applied in auto, programmer's used a circle as a basic shape. While the blending sharpness (or feathering effect of the transition) can be adjusted, it's still far from flexible enough for many cases. So be judicious in choosing the image and you will like the outcome. Bottom line: there is a lot to appreciate about Picasa. In the very least, it will show you the potential of digital manipulation. Sophisticated programs (like Photoshop, Paint Shop Pro, and perhaps most importantly the free GIMP) give an actual total control of what can be done, with an appropriate learning curve to go along of course.
If you would like to see some of other Picasa features applied, check out this short piece with examples of focus and tonal changes.
...
Monday, November 10, 2008
Adding a new feature

Oh, don't be scared, that's just me looking after you.
...
I've been hearing about the great photographs I take on occasions, so great in fact, they're even worth putting on a computer screen. So from now on, I will give access to "monitorialised" versions of some of my photographs in 2 or 3 popular screen resolutions. Why?
One: to prevent unnecessary manipulation of my images by unrelated parties, or
Two: to minimize unnecessary manipulation of my images by unrelated parties, or
Three: to discourage unnecessary manipulation of my images by unrelated parties, and
Four: to entice the interested to my images, which have NOT been manipulated by unrelated parties
How is this going to work? I won't go too fancy, but if any of my posts contains a photograph that I deem worth wider exposure, I will post links to proper resolutions. I will also tag such posts as "wallpaper", so one can quickly find all of them in the future. You can email me of course with a specific image request and I shall oblige at my earliest convenience.
The Brooklyn Bridge in the post prior has been chosen to initiate this deal (just wait for it a few please). A free deal by the way, but give credit where credit is due. I always do. Thank you.
...
I've been away, I've been busy, I've been ... well, still shootn'
Not so long ago, I had a chance to enter the New York harbor from the sea side and click at some of the most known features of NYC. I could not control the path of entry, so some may be disappointed, but here is my choice (always matured in Google's Picasa program, on that a bit later).
The engineering marvel of its time, the Brooklyn Bridge.
The engineering marvel of its time, the Brooklyn Bridge.

and the monument of the free World, Statue of Liberty

...
Monday, March 10, 2008

Tuesday, February 26, 2008
Choosing your web site host
Below I'm copying my article from a forum. I'm hearing about people experiencing problems with hosting providers. While the overwhelming choice isn't helping, you need to employ patience in the search, so once you upload your web site, you're not going to start loosing sleep over it soon after. And always DO READ the fine print. If you don't see one, ask for it.
I have a couple of hosts that I highly recommend. Each is somewhat different. First is great for a single site, second for multiple sites.
First is: Webstrike Solutions. This is a high quality host for not much money, although the cost is somewhat higher than you may be used to seeing. I used to host with them and was nothing but extremely happy with overall service, support, server up-time and site accessibility. They have recently updated their site and packages, but did leave ONE major advantage intact: you pay $30 set up fee and you have your site hosted for 12 months with no other charges. This is especially great for the uncertain ones, who are contemplating their own site, but cannot decide. If you cancel by the end of the 12-month period, you pay nothing more. Check their packages, it's worth a few minutes of your time.
I left Webstrike for unrelated reasons and am currently hosting with Host Gator. I simply needed a reseller package and the flexibility of setting up unlimited domains, something Webstrike did not have (and still doesn't I believe). Host Gator has been very good and I have no plans looking for a change at this time.
This is, of course, only a couple of good hosts. There is more, but there is far more bad ones.
So the word of caution for those who fall for the cheap $5 per month / 50gB storage packages. It never works that way. It sounds too good and IT IS. If you're not sure what to choose, log on to Web Hosting Talk. There is enough to keep you busy for days. In fact, it might get a bit overwhelming at first, but read on and you'll finally see through all the scams. Remember also, that many will "supply" good care in the early stages of your agreement. That's especially true, if you signed up long term and have a 30-day "leave-for-no-reason" guarantee.
...
Friday, February 22, 2008
The "American Queen"

"American Queen" - one of the few remaining river boats on the Mississippi. Here cought on a misty morning alongside in New Orleans, LA.
...
...
Thursday, February 21, 2008
Foggy riverside

Yet another foggy day in the Mississippi river. Mornings are usually best. As the sun rises things change fast, although if the sky has "holes", it may bring along very interesting lighting.
...
...
Wednesday, February 20, 2008
Small web site about skansens in Poland

I have put together a small web site about open air museums (skansens) in southeastern Poland. I will add more images in a near future, as well as more info, directions, maps etc. Worth a trip, if you're headed that way.
...
...
Wednesday, February 13, 2008
Tank farm

Light (thus time of the day) plays big part in the way tank farms get rendered. It's like a never ending game of highlights and shadows going at each other.
...
...
Tuesday, February 05, 2008
Exposing for RAW?
There is an interesting article in 2007 November issue of Digital Photo Pro magazine (which I frequently enjoy) about exposing for RAW. It brings up an unknown to many (including myself) issue of using camera LCD preview and histogram as means of correcting exposure WHILE shooting RAW. What's the problem, one might ask?
Assuming the author is correct (as I have no way of checking that out, but have no reason to believe otherwise), the histogram and LCD preview on ALL digital cameras are based on processed JPEG file, EVEN if you only shoot RAW. This means that one is looking at a (vastly) different data that RAW records. In extreme cases, your RAW will horribly disappoint later on. You may get to thinking: what did I do wrong? everything looked great on the histogram?
One: keep above in mind in such situations
Two: try to adjust your camera JPEG settings to see if you can get preview match RAW more closely (useless if you shoot JPEG also and unlikely to give you exact match)
Three: learn correct exposure techniques so you rely on the technique rather than the preview/histogram
The mentioned article (titled: Exposing for RAW by Andrew Rodney) is about a so called ETTR technique, that's Expose To The Right, or expose for highlights and develop for such. Film shooters may remember the EFSDFH (expose for shadows develop for highlights), which in most cases gave us the most printable negative. However, the bottom line is only one:
expose to ensure detail where it counts most, yet don't lose the highlights (unless this is your wish, of course)
I can't copy the whole article here (obviously), but I do recommend reading it. It might just fix some of your shooting techniques. The whole article is available HERE. You can even print it.
Digital Photo Pro is a bimonthly magazine targeting the digital photographer. It is (in my opinion) a high quality publication, although somewhat uneven issue to issue. It goes at newsstand for $5.99 and can be subscribed to for much less.
Subscribe to:
Posts (Atom)


